How to Use the Video Editor: Projects, Timeline, Text and Export
 by Aristotto4 min
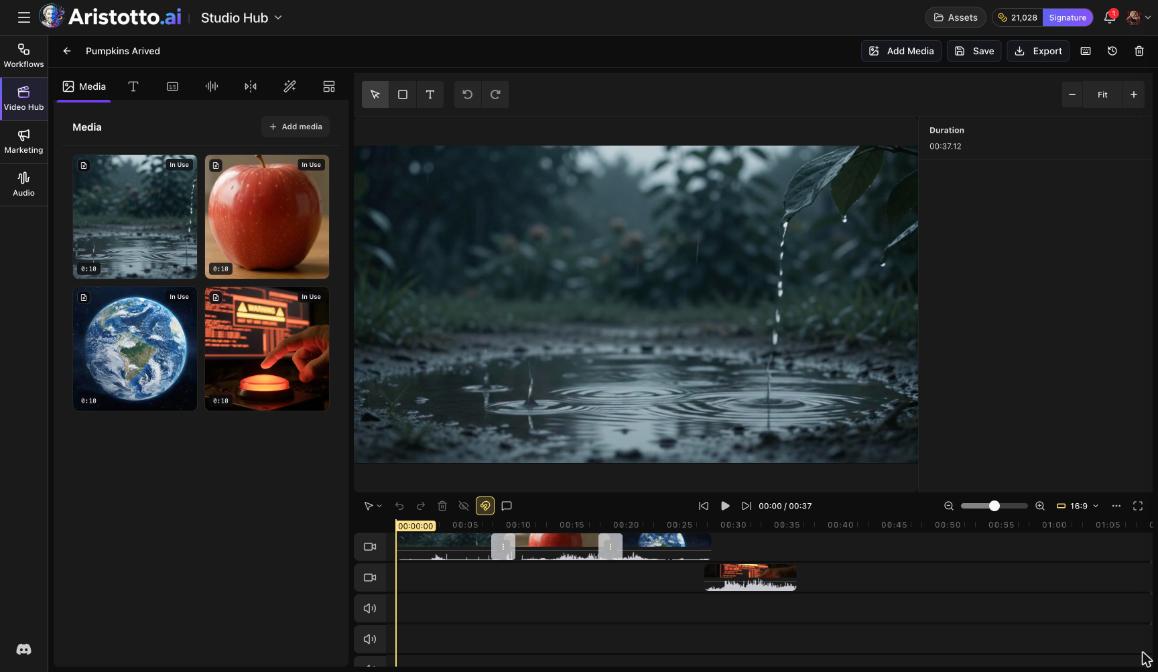
The Video Editor puts your clips on a timeline so you can trim them, arrange them, add text and export one finished video. Anyone signed in can build and edit a project. Export and Captions need a paid plan.
Open it with Video Editor under Studio Hub in the left rail. This guide covers projects, the timeline, the panels, text, exporting, a worked example and what to check when a step is blocked.
How do you start or open a project?
Press Video Editor under Studio Hub in the left rail.
The project list, Video Studio, shows your projects. Use search to find one.
Press New Project to start fresh, or open an existing project.
Inside a project, the top controls are Add Media, Save, Export, Manage access, undo and redo, project history and delete.
How does the timeline work?
The timeline has video tracks and audio tracks, with at least 2 video lanes and 3 audio lanes.
Drag clips onto a lane and move them to arrange the order.
Trim a clip to cut its start or end.
Use zoom to work more precisely.
Choose an aspect ratio such as 16:9.
Switch to fullscreen to watch your edit.
Use undo and redo for quick fixes, and project history when you want to look back at earlier changes.
Which panels can you use?
You work through seven panels: Media, Text, Captions, Audio, Transitions, Effects and Templates. Two of them need something first:
Captions: select a clip on the timeline first. Captions also need a paid plan.
Effects: select a clip on the timeline first.
The Text panel has the most options, covered in the next section.
How do you add titles and text?
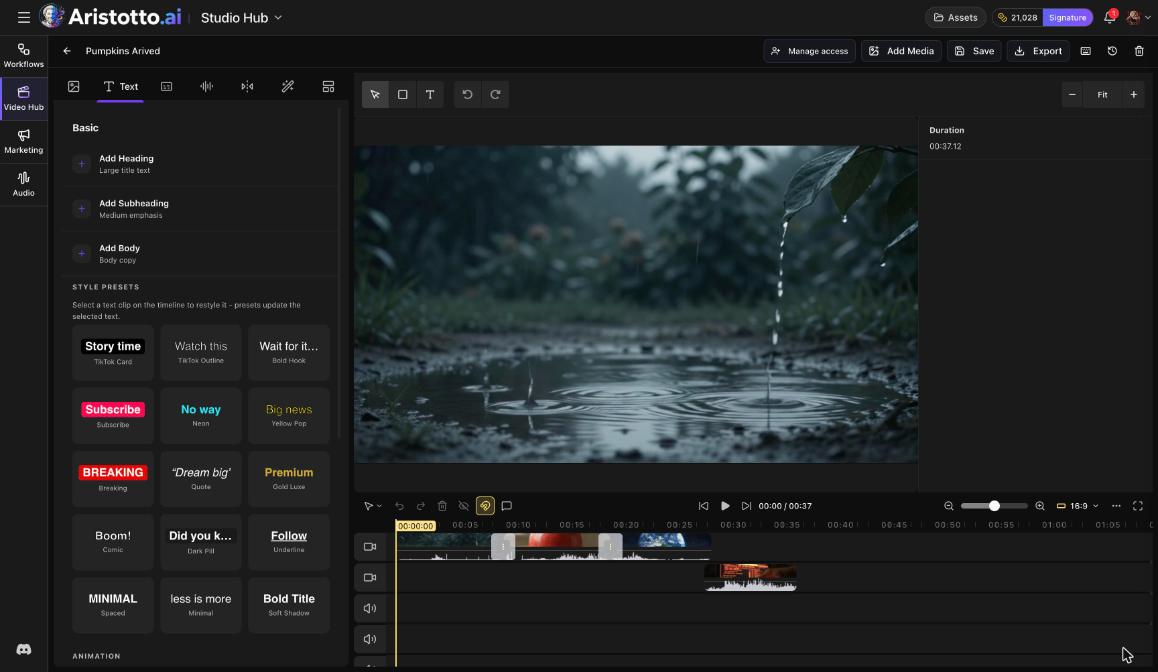
Open the Text panel.
Choose Add Heading, Add Subheading or Add Body.
Choose one of the style presets, such as Story time, Subscribe, Breaking, Boom!, Minimal or Bold Title.
Use Animation to choose how the text moves on screen.
How do you export, and where does the video go?
Press Save, then Export. Export needs a paid plan.
The video renders in your browser. Wait for the Export complete screen.
Export complete shows four choices:
Close.
Download saves the video file.
View in Assets opens it on the Studio Outputs tab.
Publish to Theater starts a Theater title in Studio, using this export as episode one. Theater is open by invite only today.
Example: how do you make a short video with a title?
Open Video Editor and press New Project.
Press Add Media and bring in three clips.
Choose an aspect ratio such as 16:9.
Drag the clips onto a video lane in the order you want, then trim the start and end of each one.
Open the Transitions panel and add a transition between two clips.
Open the Text panel, press Add Heading, pick the Bold Title preset and set an Animation.
Select a clip and open Captions to add captions (paid plan).
Press Save.
Press Export, wait for Export complete, then press Download or View in Assets.
What should you check when something does not work?
Captions or Effects do nothing: select a clip on the timeline first.
Export or Captions are blocked: both need a paid plan. Open Pricing in the account menu to see the plans.
You made a mistake: use undo, or open project history.
Export seems slow: the video renders in your browser. Wait for Export complete before you close the editor.
You cannot find an export: open Assets from the header and pick the Studio Outputs tab.
You are about to leave a project: press Save first.
You no longer want a project: delete is in the project's top controls. Check before you press it.
Questions
Can I edit videos on the free plan?
Yes. Anyone signed in can build and edit a project. Export and Captions need a paid plan.
Where do my exported videos go?
Export complete lets you download the file straight away, and every export is also saved in Assets on the Studio Outputs tab.
Can I publish my video to Theater?
Export complete has Publish to Theater, but Theater is open by invite only today.
Why can't I add captions?
Captions need a selected clip and a paid plan. Select the clip on the timeline, then open the Captions panel.